In this article we look at another few examples to display on an I2C 16×2 LCD to a raspberry Pi Pico
Parts Required
| Name | Link |
| Pico | Raspberry Pi Pico Development Board |
| I2C lCD | |
| Connecting cables | Aliexpress product link |
Schematic/Connection
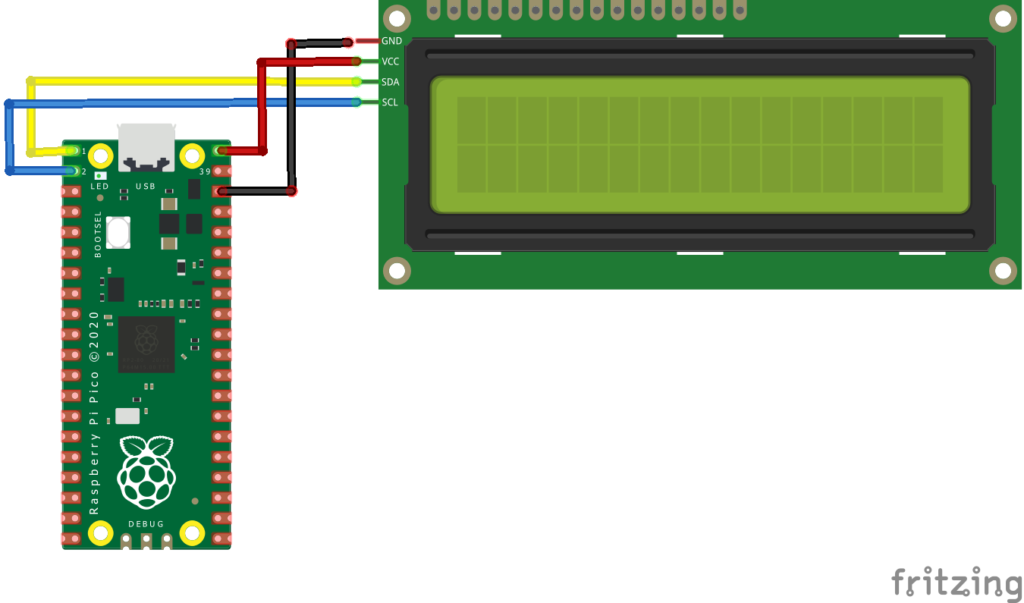
To connect the display to your Raspberry PI Pico requires just 4 wires, you just need to wire the Vcc and GND PINs from display to VBuS and a GND PINs of RPI Pico, then SDA and SCL PINs from the module to suitable SDA and SCL PINs from Raspberry PI Pico
Here is a layout in fritzing to show this

Code Examples
I use thonny for all development – we have kept this information from our 16×2 LCD article
You then need to copy 2 libraries to your Pico filesystem
In Thonny, go to top menu File => Save Copy => Raspberry Pi Pico and save each file to the board with the same name as downloaded and with a .PY extension when saving it to the board.
| https://github.com/T-622/RPI-PICO-I2C-LCD/blob/main/lcd_api.py |
| https://github.com/T-622/RPI-PICO-I2C-LCD/blob/main/pico_i2c_lcd.py |
In this example we display the 3 custom characters that we designed earlier
Counter
This simply counts from 0 to 10 and displays it on the lcd
import machine
from machine import I2C
from lcd_api import LcdApi
from pico_i2c_lcd import I2cLcd
from time import sleep

I2C_ADDR = 0x27
totalRows = 2
totalColumns = 16

i2c = I2C(0, sda=machine.Pin(0), scl=machine.Pin(1), freq=400000)
lcd = I2cLcd(i2c, I2C_ADDR, totalRows, totalColumns)

while True:
    lcd.putstr("Count - 0-10")
    sleep(2)
    lcd.clear()
    for i in range(10):
        lcd.putstr(str(i))
        sleep(1)
        lcd.clear()
Another example
This displays the I2C address on the LCD in hex and then in decimal, it also displays txt on the LCD. We then switch the backlight on and off. We then count to 20.
from machine import I2C, Pin
from time import sleep
from pico_i2c_lcd import I2cLcd
i2c = I2C(0, sda=Pin(0), scl=Pin(1), freq=400000)

I2C_ADDR = i2c.scan()[0]
lcd = I2cLcd(i2c, I2C_ADDR, 2, 16)

while True:
    print(I2C_ADDR)
    lcd.blink_cursor_on()
    lcd.putstr("I2C Address:"+str(I2C_ADDR)+"\n")
    lcd.putstr("rp2040learning")
    sleep(2)
    lcd.clear()
    lcd.putstr("I2C Address:"+str(hex(I2C_ADDR))+"\n")
    lcd.putstr("rp2040learning")
    sleep(2)
    lcd.blink_cursor_off()
    lcd.clear()
    lcd.putstr("Backlight Test")
    for i in range(10):
        lcd.backlight_on()
        sleep(0.2)
        lcd.backlight_off()
        sleep(0.2)
    lcd.backlight_on()
    lcd.hide_cursor()
    for i in range(20):
        lcd.putstr(str(i))
        sleep(1)
        lcd.clear()
Links