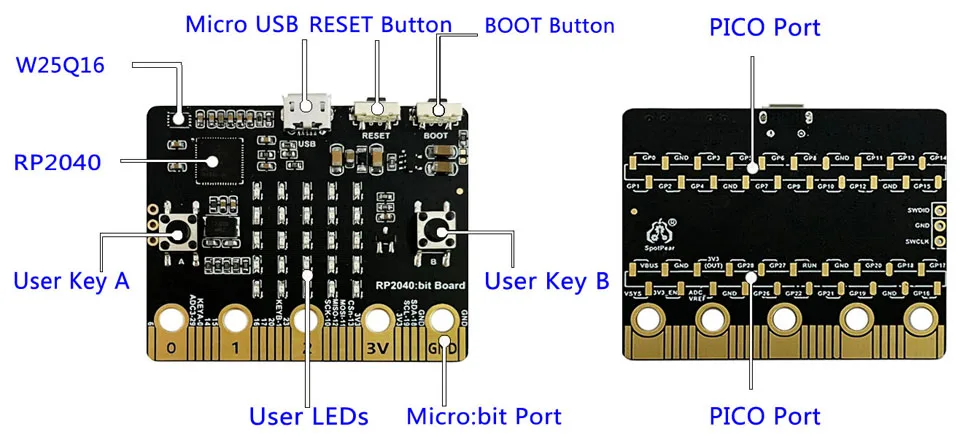
This is an RP2040:bit Board Based On Raspberry Pi Microcontroller RP2040 but is the same size and pinout as the BBC Micro:bit
Features
On-board W25Q16 16M flash Memory chip
On-board 5×5 LED matrix, each LED can be programmed separately.
On-board two programmable buttons.
You get 2 headers which you can solder on, if you want the pico pinout on the back. Other wise its this Microbit type pinout
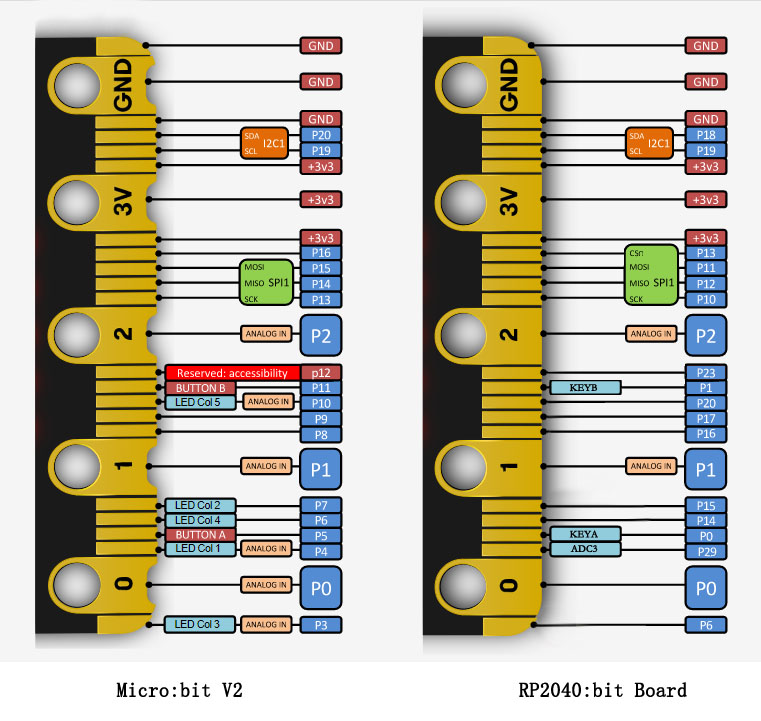
| Pin | Description |
|---|---|
| 0 | KEYA |
| 1 | KEYB |
| 10 | GPIO that is used for the serial clock (SCK) signal of the 3-wire Serial Peripheral Interface (SPI) bus. |
| 11 | GPIO that is used for the Master Out Slave In (MOSI) signal of the SPI bus. |
| 12 | GPIO that is used for the Master In Slave Out (MISO) signal of the SPI bus. |
| 13 | CSn |
| 17 | These pins are wired to the 3V supply |
| 18,19 | Implement the clock signal (SCL) and data line (SDA) of the I2C bus communication protocol. With I2C, several devices can be connected on the same bus and send/read messages to and from the CPU. |
| 29 | ADC3 |
Development
You can use Micropython, Arduino or the C++ SDK. Its an RP2040, so you can use your typical development environment. I tried micropython using Thonny.
from machine import Pin
import time

led_Col=[2,3,4,5,25,7,8,9,21,22];

Pin(led_Col[0], Pin.OUT)
Pin(led_Col[1], Pin.OUT)
Pin(led_Col[2], Pin.OUT)
Pin(led_Col[3], Pin.OUT)
Pin(led_Col[4], Pin.OUT)
Pin(led_Col[5], Pin.OUT)
Pin(led_Col[6], Pin.OUT)
Pin(led_Col[7], Pin.OUT)
Pin(led_Col[8], Pin.OUT)
Pin(led_Col[9], Pin.OUT)

buttonA= Pin(0, Pin.IN, Pin.PULL_UP)
buttonB = Pin(1, Pin.IN, Pin.PULL_UP)

while 1:

    for i in range(len(led_Col)):

        i>5

        j=Pin(led_Col[i], Pin.OUT)

        Pin(led_Col[0], Pin.OUT).low()
        Pin(led_Col[1], Pin.OUT).low()
        Pin(led_Col[2], Pin.OUT).low()
        Pin(led_Col[3], Pin.OUT).low()
        Pin(led_Col[4], Pin.OUT).low()
        Pin(led_Col[5], Pin.OUT).high()
        Pin(led_Col[6], Pin.OUT).high()
        Pin(led_Col[7], Pin.OUT).high()
        Pin(led_Col[8], Pin.OUT).high()
        Pin(led_Col[9], Pin.OUT).high()

        time.sleep(0.2)

        j.high()
        Pin(led_Col[5], Pin.OUT).low()

        time.sleep(0.2)

        j.high()
        Pin(led_Col[6], Pin.OUT).low()

        time.sleep(0.2)

        j.high()
        Pin(led_Col[7], Pin.OUT).low()

        time.sleep(0.2)

        j.high()
        Pin(led_Col[8], Pin.OUT).low()

        time.sleep(0.2)

        j.high()
        Pin(led_Col[9], Pin.OUT).low()

        time.sleep(0.2)

        if (buttonA.value()==0):

            Pin(led_Col[0], Pin.OUT).high()
            Pin(led_Col[1], Pin.OUT).high()
            Pin(led_Col[2], Pin.OUT).high()
            Pin(led_Col[3], Pin.OUT).high()
            Pin(led_Col[4], Pin.OUT).high()
            Pin(led_Col[5], Pin.OUT).low()
            Pin(led_Col[6], Pin.OUT).high()
            Pin(led_Col[7], Pin.OUT).high()
            Pin(led_Col[8], Pin.OUT).high()
            Pin(led_Col[9], Pin.OUT).high()

            time.sleep(0.5)

        elif (buttonB.value()==0):
            Pin(led_Col[0], Pin.OUT).low()
            Pin(led_Col[1], Pin.OUT).low()
            Pin(led_Col[2], Pin.OUT).low()
            Pin(led_Col[3], Pin.OUT).low()
            Pin(led_Col[4], Pin.OUT).high()
            Pin(led_Col[5], Pin.OUT).low()
            Pin(led_Col[6], Pin.OUT).low()
            Pin(led_Col[7], Pin.OUT).low()
            Pin(led_Col[8], Pin.OUT).low()
            Pin(led_Col[9], Pin.OUT).low()


            time.sleep(0.5)
The LEDs lights up one by one.
When button A is pressed, the first horizontal row of LEDs on the top will light up.
When button B is pressed, the row near button B lights
Pricing
You can get this board for under £7 from Aliexpress
| Raspberry Pi Pico RP2040 bit board |
| Raspberry Pi Pico RP2040 bit kit |