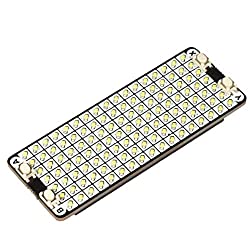
In this article we look at the Pico Scroll Pack which 119 white LEDs in a tidy 17×7 matrix, as well with four tactile buttons for interacting with your Pico.
The brightness of each LED is individually controllable an d its ideal for a text scroller

Features
17×7 matrix of white LEDs
Individual PWM brightness control of each LED
IS31FL3731 LED matrix driver chip which uses I2C address: 0x74
4 x buttons
Pre-soldered female headers for attaching to Pico
Compatible with Raspberry Pi Pico.
You can power this using USB or external power

The Pico Scroll Pack talks to the IS31FL3731 LED driver chip over I2C requiring only SDA and SCL pins.
The four switches are wired up as SW_A, SW_B, SW_X, and SW_Y.
Power is supplied through the VSYS pin which means that you can use Pico Scroll Pack both on USB power and from external supplies (so long as they can supply 3V+) making it ideal for battery powered projects.
Getting started
The labels on the underside of Pico Scroll Pack will show you which way round to plug it into your Pico – just match up the USB port with the markings on the board.
The easiest way to get started is by downloading and copying the custom MicroPython uf2 to your Pico, it includes all the libraries you'll need to use our add-ons.
https://github.com/pimoroni/pimoroni-pico/releases/latest/
To be able to copy this file on to your Pico, you'll need to put it into bootloader mode. To do this, hold down the BOOTSEL button whilst plugging the USB cable into your computer – it should now show up as a drive called RPI-RP2. Here's what it looks like in Windows:
Copy the downloaded .uf2 file across to this new drive. Your Pico will now reboot
Code examples
Here is an example
[codesyntax lang=”python”]
import time
import picoscroll as scroll

scroll.init()

while True:
    scroll.scroll_text("Hello World", 128, 80)
    time.sleep(1)
[/codesyntax]
and
[codesyntax lang=”python”]
import time
import picoscroll as scroll

scroll.init()
i = 0
loop = 18
br_mult = 1
br_pressed = 32
tail = 12

width = scroll.get_width()
height = scroll.get_height()

while True:
    scroll.clear()
    for y in range(0, height):
        for x in range(0, width):
            if x < 3 and y < 3 and scroll.is_pressed(scroll.BUTTON_A):
                scroll.set_pixel(x, y, br_pressed)
            elif x < 3 and y > 3 and scroll.is_pressed(scroll.BUTTON_B):
                scroll.set_pixel(x, y, br_pressed)
            elif x > width - 4 and y < 3 and scroll.is_pressed(scroll.BUTTON_X):
                scroll.set_pixel(x, y, br_pressed)
            elif x > width - 4 and y > 3 and scroll.is_pressed(scroll.BUTTON_Y):
                scroll.set_pixel(x, y, br_pressed)
            else:
                m = (x + (y * width)) % loop
                for b in range(0, loop):
                    if m == (i + (loop - b)) % loop and b < tail:
                        scroll.set_pixel(x, y, br_mult * (tail - b))

    scroll.update()
    i += 1
    if i >= loop:
        i = 0
    time.sleep(0.02)
[/codesyntax]
Products
| Name | Link |
| Pico | Raspberry Pi Pico Development Board A Low-Cost High-Performance Microcontroller Board RP2040 Cortex-M0+ Dual-Core ARM Processor |
| Pico Scroll Pack UK | Pico Scroll Pack |
